At Captiv8, we are using Amazon AWS to host most of our PHP projects. We are heavily rely on Elastic Beanstalk to help us set up PHP environment, database and load balancer. On top of that, we are also managing our own server image based on Amazon AMI. In this image, we installed additional software and packages that we need for our application. However, this approach has a drawback as it is difficult to maintain the image and track changes. Everytime you need to update the image, you have to create new server, install the new software and export it into new image. This will leave you with bunch of different images and it is hard to tell what are the things that have changed inside each image.
Chef
In order to solve these problems, I decided to find a way to automate the process. My first attempt was trying to use Chef to provision the Elastic Beanstalk environment. I have been using Chef for a while to provision my Vagrant machines. It is powerful and more convenient in compare with bash scripts. Since I am already familiar with Chef, I started looking at tutorials on how to use Chef with Elastic Beanstalk. Most of the tutorials that I found don’t provide easy way to integrate Chef with Elastic Beanstalk. One of them mentions about using AWS OpsWorks with Chef but I think it is overkill for the time being. So, I ditched Chef and start looking for another solution.
ebextensions
ebextensions is another solution that I found after checking the official documentation of Elastic Beanstalk. With this solution, you need to to create .ebextensions folder inside your project and create a file to define what are the packages that you want to install into the environment. Elastic Beanstalk will automatically run the script every time you deploy a new version of the application. Aside from that, you can also tell ebextensions to execute shell script in the instance or changing permission of a file. You can read more details about ebextension here: http://docs.aws.amazon.com/elasticbeanstalk/latest/dg/customize-containers-ec2.html
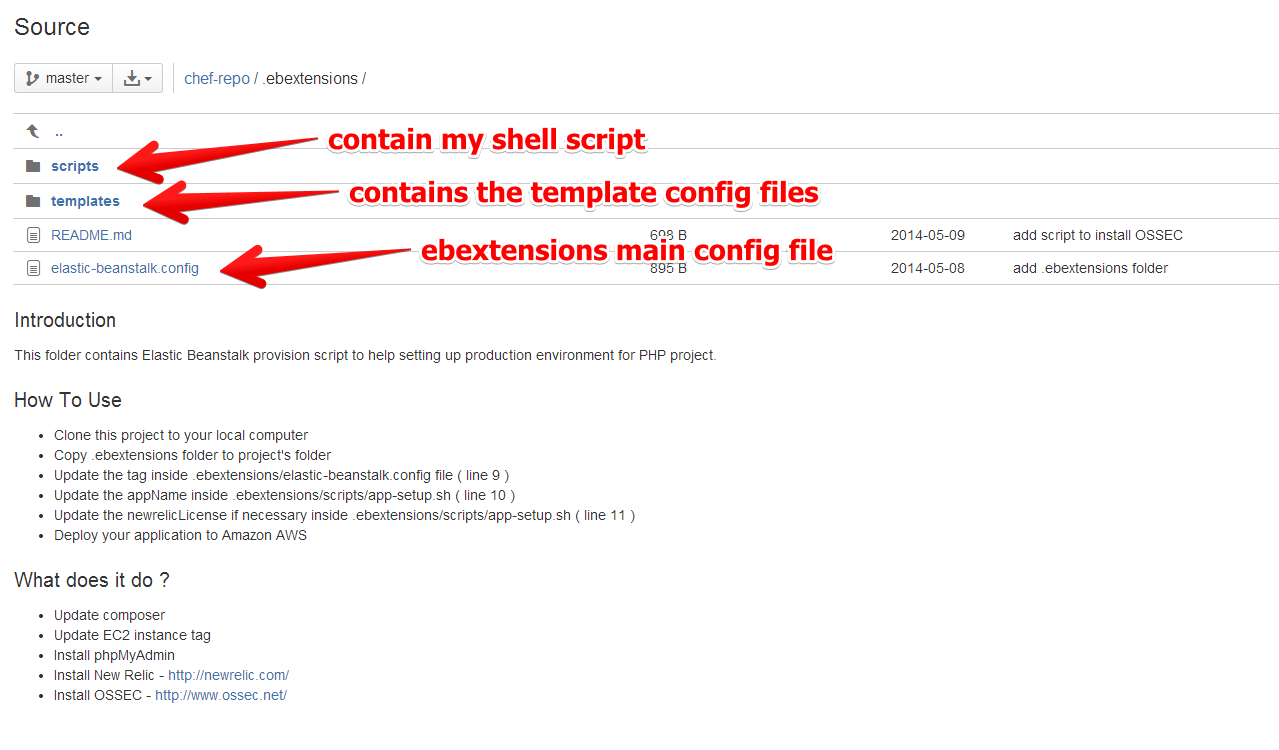
This is my directory structure at the moment:

Here is the example of my ebextension config file:
 1
 2
 3
 4
 5
 6
 7
 8
 9
10
11
12
13
14
15
16
17
18
19
20
21
22
23
24
25
26
27
28
29
30
31
32
|
packages:
  yum:
    mlocate: []

commands:
  01updateComposer:
    command: export COMPOSER_HOME=/root && /usr/bin/composer.phar self-update
  02updateTag:
    command: ec2-create-tags $(ec2-metadata -i | cut -d ' ' -f2) --tag Project=ChangeThis
    cwd: /home/ec2-user
    env:
      EC2_HOME: /opt/aws/apitools/ec2
      EC2_URL: https://ec2.ap-southeast-2.amazonaws.com
      JAVA_HOME: /usr/lib/jvm/jre
      PATH: /bin:/usr/bin:/opt/aws/bin/

container_commands:
  01-command:
    command: updatedb
  02-command:
    command: rm -rf /captiv8/.ebextensions
  03-command:
    command: mkdir -p /captiv8/.ebextensions
  04-command:
    command: cp -R .ebextensions/* /captiv8/.ebextensions/
  05-command:
    command: bash /captiv8/.ebextensions/scripts/app-setup.sh

option_settings:
  - namespace: aws:elasticbeanstalk:application:environment
    option_name: COMPOSER_HOME
    value: /root
|
And this is the example of my bash script:
 1
 2
 3
 4
 5
 6
 7
 8
 9
10
11
12
13
14
15
16
17
18
19
20
21
22
23
24
25
26
27
28
29
30
31
32
33
34
35
36
37
38
39
40
41
42
43
44
45
46
47
48
49
50
51
52
53
54
55
56
57
58
59
60
61
62
63
64
65
66
67
68
|
#!/usr/bin/env bash

#
# References:
# - http://www.hudku.com/blog/configuration-setup-customizing-aws-elastic-beanstalk/
# - http://www.hudku.com/blog/security-credentials-customizing-aws/#.elastic-beanstalk-app
#

# Main configuration, change these for each project
appName="change_this"
newrelicLicense="newreliclicense"

# Check if this is the very first time that this script is running
if ([ ! -f /root/.not-a-new-instance.txt ]) then
  newEC2Instance=true
fi

# Install applications if this is new instance
if ([ $newEC2Instance ]) then
    # Allow sudo command to be used as part of beanstalk ebextensions scripts without a terminal
    grep -q 'Defaults:root !requiretty' /etc/sudoers.d/$appName || echo -e 'Defaults:root !requirettyn' > /etc/sudoers.d/$appName
    chmod 440 /etc/sudoers.d/$appName

    # Add sudo command if not already present to .bashrc of ec2-user so that we are logged on as root when we use ssh
    grep -q "sudo -s" /home/ec2-user/.bashrc || echo -e "nsudo -sn" >> /home/ec2-user/.bashrc

  # Install phpMyAdmin
  yum -y --enablerepo=epel install phpmyadmin
  rm /etc/httpd/conf.d/phpMyAdmin.conf
  rm /etc/phpMyAdmin/config.inc.php
  mv /captiv8/.ebextensions/templates/phpMyAdmin/phpMyAdmin.conf /etc/httpd/conf.d/
  mv /captiv8/.ebextensions/templates/phpMyAdmin/config.inc.php /etc/phpMyAdmin/
  chmod 644 /etc/httpd/conf.d/phpMyAdmin.conf
  chmod 644 /etc/phpMyAdmin/config.inc.php
  service httpd restart

  # Install New Relic
  rpm -Uvh http://yum.newrelic.com/pub/newrelic/el5/x86_64/newrelic-repo-5-3.noarch.rpm
  yum -y install newrelic-php5
  echo -ne '\n\' | newrelic-install install
  rm /etc/php.d/newrelic.ini
  mv /captiv8/.ebextensions/templates/newrelic/newrelic.ini /etc/php.d/
  chmod 644 /etc/php.d/newrelic.ini
  perl -pi -e "s/PHP Application/$appName/g" /etc/php.d/newrelic.ini
  perl -pi -e "s/newrelicLicense/$newrelicLicense/g" /etc/php.d/newrelic.ini

  # Install New Relic Server Monitor
  yum -y install newrelic-sysmond
  nrsysmond-config --set license_key=$newrelicLicense
  /etc/init.d/newrelic-sysmond start
  service httpd restart

  # Install OSSEC
  yum -y install mysql-devel postgresql-devel
  wget http://www.ossec.net/files/ossec-hids-2.7.1.tar.gz -P /captiv8
  tar xzvf /captiv8/ossec-hids-2.7.1.tar.gz -C /captiv8
  rm /captiv8/ossec-hids-2.7.1.tar.gz
  rm /captiv8/ossec-hids-2.7.1/etc/preloaded-vars.conf
  mv /captiv8/.ebextensions/templates/ossec/preloaded-vars.conf /captiv8/ossec-hids-2.7.1/etc/
  /captiv8/ossec-hids-2.7.1/install.sh
  /var/ossec/bin/ossec-control start
fi

# If new instance, now it is not new anymore
if ([ $newEC2Instance ]) then
    echo -n "" > /root/.not-a-new-instance.txt
    chmod 644 /etc/php.d/.not-a-new-instance
fi
|
Inside my ebextensions config file, I call the shell script which will install additional software. The benefit of using shell script is you have more options and it is much easier to customize the software. Since the .ebextensions folder is copied to the instance, you can tell the shell script to copy a template config file that you have prepared before hand. I hope you find this blog post useful.
